Saturday, August 25, 2012

Part 3: Building Microsoft failover clustered HyperV LAB at home


Building Microsoft failover clustered HyperV LAB at home
Lab configuration: Part 1

Configuring and Testing High Availability of VM: Part 8

Configuring initiator and shared disks on Hyperv01

Click iscsi initiator from administrative tools.

Click yes to start Service and set it to automatic so it will start iscsi service after every reboot automatically.

 Next enter target IP and press quick connect.

It has connected to target via 3620 port. Press done. And you will see Target is in discovered Targets list  and status is connected.

Go to Server Manager>Storage>Disk management, right click disk1 bring it online then right click disk2 bring it online as well. Once they are online status of disk1 and disk2 will change to not initialized. Initialize them.
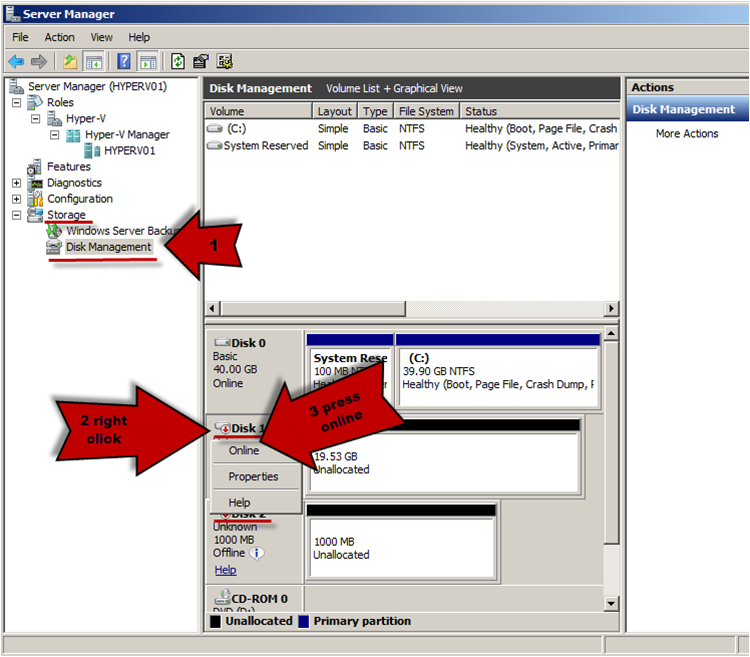

right click on disk1 and click initialize disk, keep all the defaults and press ok.

Both disk will get initialize and we can format them.

Once they are online right click disk 1 create a new simple volume.

Keep all the defaults except below configurations.
Drive letter: P
Volume label: Shared_disk

Format disk 2 with  below configuration
Drive letter: Q
Volume label: Quorum_disk

Once configuration done check in computer which hard disk are showing, they should look like below.


Configuring initiator and shared disks on Hyperv02.

Follow the same steps from configuring initiator on Hyperv01 on Hyperv02 for configuration of iSCSI initiator.

To configure disk make them online no need to initialize and format them as those shared disks are already initialized and formatted by Hyperv01 host. Just need to change their drive letters.

Change drive letter of 20 gb disk to P: and drive letter of 1 gb to Q:


Press ok, then yes, then ok again.
Now check in the computer you will see 2 drives P: and Q:

Part 2: Building Microsoft failover clustered HyperV LAB at home

Building Microsoft failover clustered HyperV LAB at home
Lab configuration: Part 1
Configuring and Testing High Availability of VM: Part 8
Powershell Rocks - Creating virtual Nic cards for testing (Standalone HyperV)
Error resolved: Hyperv cannot be installed: A Hyperviser is already running.

Preparing iSCSI Target (installing and configuring Microsoft Software Target 3.3)


What is Microsoft iSCSI target?
Microsoft iSCSI Target (Server) is a software where Disks (Luns) are presented to their initiators (Clients) to access it concurrently over network. From above screen as you can see iscsi target software is installed on bottom server and it has created 2 VHD extention (virtual harddisk) files, then they are accessed by initiator (client) servers on network. Initiators use them as a local disks.

I am assuming here you have downloaded Microsoft iSCSI Target 3.3 on iSCSI_server, log onto it. Execute installation setup, extract files to default c:\iscsitarget.

Execute iscsitarget_public.msi from c:\iscsitarget\x64

Main part starts from here, Install software with all the defaults. Launch Microsft iSCSI software Target from administrative tools.

Right click iSCSI Targets, and click Create iSCSI Target.

Enter the name for iSCSI target, description is optional.

Next screen is something similar to SAN zoning, here I am  going to add hyperV servers' ip address in the advanced, so only they can access lun presented by this target. Press Advanced button.


Press ADD button to add which host can access this target, Select IP address from the dropdown list, you can use hostname, initiator IQN as well.

IQN stands for iSCSI qualified name, you will find it on iSCSI initiator once you start the service on the hosts.

Add ip address in value  click ok, Once you add IP addresses of HyperV servers, it will show in the identifiers list. While adding more than one IP it will show another dialog box that do you want to use this target by multiple initiators, press ok twice press next then finish.

Your iSCSI target is ready, but there are no disks to present to initiator. lets create it. Right click iSCSItarget, select create virtual disk for iSCSI Target
 

I am keeping my files on d:\vDisks folder as shown example and always give .vhd extension for file, without it, It will not process. Click next.

Next configure size for vhd file, I have total 40 gb of D drive space and 39.30 GB is free, so I can only assign below 39.30 gb size for the vhd file, configure it to 20000 MB means 20 GB. If you add another disk you will see only 19.30 GB is remaining. And if you try size more than 19.30 gb you will get error not enough space at the finish.


Next screen is Description for the virtual disk, it is optional and can be press next to finish wizard.

Same way create another disk with below configuration

File name and location
D:\vdisks\Quorum.vhd
Size of virtual disk (MB):
1000
Virtual disk Description
This is Quorum disk

It will look like below once configured.

Open D:\vdisks and check the file size and extensions. 

CBM file is for integrity check of VHD file, When creating a snapshot of a VHD, the CBM is used to track the changes to the VHD file since the last snapshot, which allows fast rollback of the VHD.

Here our iscsi target server is ready and working now need to configure iscsi initiators.
 

Part 1: Building Microsoft failover clustered HyperV LAB at home


Building Microsoft failover clustered HyperV LAB at home
Lab configuration: Part 1

Configuring and Testing High Availability of VM: Part 8
Powershell Rocks - Creating virtual Nic cards for testing (Standalone HyperV)
Error resolved: Hyperv cannot be installed: A Hyperviser is already running.

Before starting I just want you to know that this document is for demo/Lab purpose, do not try it on Production environment servers. I will not be responsible for any damage

In this Home lab I am going to setup hyperV with below servers and settings, Here I am virtualizing all my environment on VMware workstation 8.

For hyperV VMs check my blog (It will be helpful)

Note: links can be changed over period of time by Microsoft

I am using below VMs and their configuration below.


How it looks in Network Connections after renaming Nics on Virtual machine Hyperv01 (AD has only one nic named vNetwork and iscsi_server has iSCSI)

Install and configure Active Directory on hostname "AD" with "vcloud.lab" domain name, it will install DNS by default, Configure reverse lookup zone on it with 192.168.33.

Pull Hyperv01 and Hyperv02 into vcloud.lab domain.