Thursday, January 24, 2013

Installing Esxi server 5.1 (Part 1)

Installing Esxi server 5.1 (Part 1)
I had assigned task to support my remote location where there isn't technical person who is aware on the VMware technology specially on installing configuring and managing. Remote location where in Malaysia, After some discussion I agreed to send them screenshot documents what I wanted them to configure on standalone esxi server. Also they where going to purchase only single server where I wanted them to install esxi server,  I am sharing the same document with you.
Here I used my lab to take all the screenshot, somewhat same setup is going to be at remote location. Installing require you should connect to drac, Ilo depending hardware, in my case remote tech was in front of server i asked him to burn iso on CD/DVD. and asked him to boot from that CD/DVD.
Installation of Esxi 5.1 server
Select the first option from the menu to start esxi 5.1 installation., Or it will automatically boot into instller even you don't press anything.

Above 2 screenshots are self explantory, press f11 to vmware eula. I have 2 Local disks (HDD) in my server. Select the first HDD (vmhba1:C0:T0:L0) from list and hit enter to continue. whatever the first hard disk is i wanted them to install esxi os there., I was trying to simulate everything as much as possible on office lab.

This is keyboard layout selection.
 
Type same password twice and hit enter, this is root password, so note it down somewhere.

 
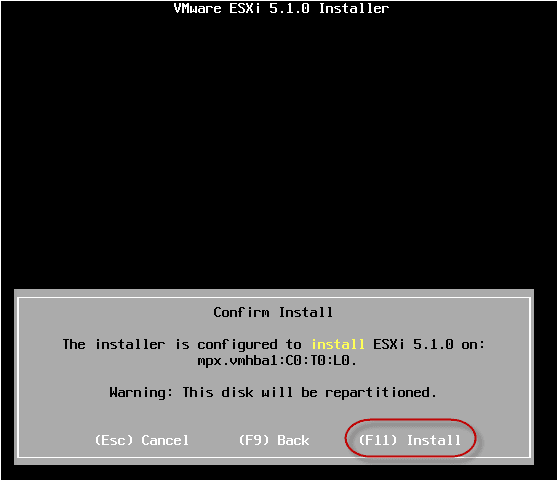
Make sure you don't have any data on the HDD as it will partition HDDs, Press F11 to continue for formatting and final installation of OS.


Here install will actually start and in the end you will see reboot. 


Differance Between HyperV live migration and Quick Migration

Live Migration


With HyperV live migration, you can move running VMs from one Hyper-V physical host to another without any disruption of service or perceived downtime.  It requires Microsoft Failover Clustering.

All the Vm memory pages are transferred from one HyperV Host to another HyperV host, while transferring it tracks modification of its memory pages and changes are done on destination host' VM memory. Once all the memory changes synchronized another Host brings VM online.

There is very minimal and unnoticeable downtime in live migration


Quick Migration moves (running) virtual machine from one HyperV host to another HyperV host with minimal downtime, taking advantage of Microsoft failover clustering and SCVMM.

HyperV saves the state of VM to shared storage as same as hibernation (It saves memory of virtual machine to disk/shared storage and during this period VM is unavailable on network ), it Unregisters VM from first HyperV host and registers it on another HyperV Host and resume this saved state. Speed is depending on VM memory size and storage connectivity, 

Quick migration can result in short window where the VM is not running.


download this video from: https://skydrive.live.com/embed?cid=BFEC67332E5B7634&resid=BFEC67332E5B7634%21116&authkey=AGeFIUH2Qn3Y-Uc

Thursday, January 17, 2013

Migrate Windows 2003 DC to Windows 2008 infrastruction with 5 easy steps


1) Raise functional domain level on Windows 2003 domain.
  • Log on to windows 2003 server. Open Start>Administrative Tools>Active Directory Users and computers
  • Right click on Domain, the click on raise domain functional level from context menu
  • In the Select an available domain function level drop down box select highest domain level (here I don't have any windows 2000 domain servers in my infrastructure) and click on raise

2) Prepare domain controller (update schema using adprep)
  • Insert Windows 2008 DVD on the windows 2003 DC server.
  • Open command prompt Start>Run>cmd
  • Change drive letter and drive path to dvdrom:\support\adprep
  • Run command adprep32 /forestprep (Here my windows 2003 os is 32 bit if you have 64bit just run adprep /forestprep)
  • Run command adprpe32 /domainprep
  • last command need to run adprep32 /domainprep /gpprep


3) Add Windows 2008 server as an additional Domain controller
  • Log on to windows 2008 server, Open Server Manager on windows 2008 server then right click on Roles and add roles Active Directory Domain Services (you can directly run DCPROMO as well)
  • After running DCPROMO.exe select existing forest and add a domain to an existing domain click next
  • Type the domain name and set alternate credentials (domain admins or who has authority to add server to domain)
  • You can keep all other settings defaults and click next until finish (Settings may be defer policy wise, As this is my first windows 2008 DC I am keeping it as a DNS server and GC).
  • Once the server is rebooted you can check Active Directory data has been replicated to windows 2008 server


4) Transfer FSMO roles to Windows 2008 Server
  • Transfer all five roles one by one to windows 2008 server, log onto it, 
  • I am transferring schema master first, open command prompt and type regsvr32 schmmmgmt.dll, which will register and make visible active directory schema MMC snap-in in MMC. Open MMC tool and add Active Directory Schema as shown in video, right click on Active Directory Schema and select change active directory domain controller to windows 2008 server, then right click again on Active Directory Schema and select Operations Master and click on change to transfer schema master role.
  • Same way you can transfer domain master role in Active Directory Domain and Trusts MMC console. and to transfer RID, PDC & Infrastructure FSMO roles use Active Directory Users and Computers
  • In the last confirm by command which server holds which role. Netdom query fsmo
 
You can transfer roles through command prompt as well using ntdsutil command. http://support.microsoft.com/kb/255504


5) Demote Domain controller on Windows 2003 server.
  • In window 2003 server, Open Manage Your Server and select Add or remove role, select Domain Controller (Active Directory) from the list, check the box Remove the domain controller role. then click next until it finishes.
  • Once it has been done you can check on windows 2008 server that windows 2003 server is no longer exist in domain controller (in Active Directory users and computers), it has been moved to computers.

You can use dcpromo.exe /forceremoval command to demote active directory. once the server demoted you can start further decommission process by disjoining it from domain then removing computer account from active directory.

Monday, October 8, 2012

Setting up NFS Server on Windows 2008 R2 for VMware vSphere


Setting up NFS Server for VMware vSphere

Here I am setting up NFS server in my existing environment, My Active directory is already setup with below configuration
Hostname: AD
IP address: 192.168.33.11
Domain Name: vcloud.lab

Open server manager, right click Active Directory Domain Services and add role services.
 
Check the box "Identity Management for UNIX" (These services maps Unix accounts into active directory) and click on next,  click install on the next screen, once installation get completed it will ask for restart once, you click close. Go with the restart.
Once the server restarted expand vcloud.lab in Active Directory Users and computers. And create new Organization Unit named UnixUsers.

Create a New group named "Unix_Users_group" with default settings inside Unixusers OU.
 
Right click Unix_Users_group under UnixUsers OU and select properties

Go to UNIX Attributes properties. From the drop down menu of NIS Domain select your Domain.(here my domain is "vcloud") keep all other settings default.
Select Members Tab and click Add administrator.
 
Go to Users and right click Administrator account the click properties, on the UNIX Attributes tab, Select vcloud from the NIS Domain. All the other settings will be populated automatically. (if you have added more users in unix_users_group , once you goes to those users Unix attributes tab and enable NIS domain, you will see increment in UID numbers.)
Now next step is to install File server role for NFS services. I am using here my another server called vCenter (this server is hosting my vCenter server and was already pulled in vcloud.lab domain.)
Open Server Manager and right click Roles and select add Roles. Select File services and click next.
Check Services for Network File System on the select role services. And install services.
 Open services for Network File System (NFS) from Administrative Tools.
Right click Services for NFS and click Properties
Check box Active Directory domain name and type your domain name (here mine is vcloud.lab)
I have created NFS_Drive folder on the C drive of vcenter server. Right click and go to properties.
Go to NFS Sharing Tab and Click Manage NFS Sharing.

Select 2 settings and keep rest of the defaults as below screen.

·         Share this folder
·         Allow anonymous access

And next click Permissions button.
Select the type to Read-Write and check the box allow root access.

Open vsphere client. (you can directly connect esxi host as well),  select host, go to configuration tab, then select storage from Hardware, and click on Add Storage.
Click Network File system.

Type the necessary information, Folder name is case sensitive.
Click next then finish and check the result in Storage.