Wednesday, December 30, 2015

Save complete virtual PortGroup information Settings - Powercli

This script I have written to pull information from all the Virtual PortGroup on esxi/vcenter and data is saved in a single CSV file, You can use it as a backup also, It is very helpful when modifying, analysing Portgroup configuration, If you take the portgroup backup with this script frequently you can even tell what are the changes done last time or compare those settings. This has saved my lots of time while troubleshooting my Virtual Standard Switch networking.

Earlier script for collecting networking information
PowerCLI esxi host Physical nic info in nice table format 

Find CDP or LLDP information on Windows Servers


Below are the settings captured and stored in CSV file.
  • Esxi server name
  • PortGroup Name, This will be per esxi server not the common one
  • Vlan Id configured on PortGroup
  • vSwitch name Portgroup resides
  • PortGroup Type (vmkernel or Virtual Machines)
  • Mac Address (If portgroup is virtual machine, Mac address of all virtual machines, else mac address of vmkernel portgroup)
  • PortGroup Security Settings  (Promiscuous mode, Mac address Changes, forged transmits)
  • NicTeaming Settings (Whether they are inherited from vSwitch)
  • Notify Switches
  • Failback, order
  • Active Nics, Standby Nics, Unused Nics
  • Virtual machines count on the portgroup and their name, Ip address,
  • PortGroup Binding compliance
  • MTU Settings
  • Management, vMotion, Ft, vSan enabled for vmkernel portgroup
This is the first screenshot when I am running script, It will collect all the virtual portgroup on the esxi in vCenter and then will collect and store information from each PortGroup in CSV file.
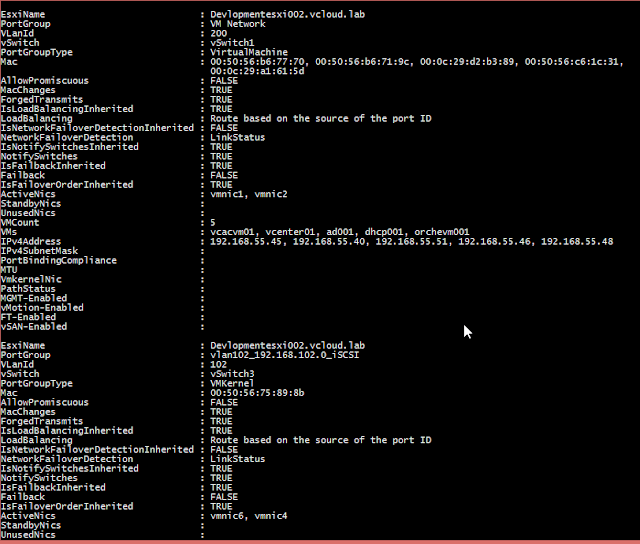
This is the second screenshot I want to show how the data will look like on the console. Some of the information will be blank depending on if portgroup is VMKernel or virtual machines.
Copy paste below code in text file and rename extension to .ps1
 <#  
 .SYNOPSIS  
  Gets the complete virtual portgroup information  
 .DESCRIPTION  
  This script creates a report of complete virtual portGroup information  
  of the vm’s guest OS  
 .NOTES  
  Find more information on http://kunaludapi.blogspot.com  
  Make sure you have installed Powercli and can connect to vcenter.  
 .EXAMPLE  
  PS C:\Temp> .\Get-VirtualPortGroupInfo.ps1  
 .EXAMPLE  
  PS C:\Temp> .\Get-VirtualPortGroupInfo.ps1 | Export-Csv -NoTypeInformation -Path C:\Temp\NetworkInformation.csv  
 #>  
   
  #####################################    
  ## http://kunaludapi.blogspot.com    
  ## Version: 1    
  ##    
  ## Tested this script on    
  ## 1) Powershell v4    
  ## 2) VMware vSphere PowerCLI 6.0 Release 1 build 2548067   
  ## 3) Vsphere 5.5    
  #####################################    
 Begin {  
 if (-not(Get-PSSnapin vmware.vimautomation.core -ErrorAction SilentlyContinue)) {  
   Add-PSSnapin vmware.vimautomation.core -ErrorAction SilentlyContinue  
 }  
 $report = @()  
 $IPregex=‘(?<Address>((25[0-5]|2[0-4][0-9]|[01]?[0-9][0-9]?)\.){3}(25[0-5]|2[0-4][0-9]|[01]?[0-9][0-9]?))’  
 $VMHosts = Get-VMHost  
 } #begin  
 Process {  
   foreach ($esxi in $VMHosts) {  
   Write-Host "Collecting PortGroups from Esxi Server `"$($esxi.Name)`"" -BackgroundColor DarkGreen  
   
   #All PortGroups in esxi server  
   $PortGroup = $esxi | Get-VirtualPortGroup  
     
   #iSCSI software adapter on esxi  
   $iSCSIHBA = $esxi | Get-VMHostHba -Device $HBA -Type iSCSI | Where-Object {$_.Model -eq "iSCSI Software Adapter"}  
   
   #All VMKernel Ports on esxi Server  
   $VMkernelPorts = $esxi | Get-VMHostNetworkAdapter -Name vmk*  
   
   #Esxicli information of esxi server  
   $esxcli = $esxi | Get-EsxCli  
   
     foreach ($Group in $PortGroup) {  
       Write-Host "`tFetching Info from Portgroup `"$($Group.Name)`"" -ForegroundColor Yellow  
         
       $Obj = New-Object psobject  
       $Obj | Add-Member -Name EsxiName -MemberType NoteProperty -Value $esxi.Name  
       $Obj | Add-Member -Name PortGroup -MemberType NoteProperty -Value $Group.Name  
       $Obj | Add-Member -Name VLanId -MemberType NoteProperty -Value $Group.VLanId  
       $Obj | Add-Member -Name vSwitch -MemberType NoteProperty -Value $Group.VirtualSwitchName  
         
       #Find whether PortGroup is VMKernel or VirtualMachine  
       if ($VMkernelPorts.PortGroupName -contains $group.Name) {  
         $Portgrouptype = "VMKernel"  
       } #if ($VMkernelPorts.PortGroupName -contains $group.Name)  
       else {  
         $Portgrouptype = "VirtualMachine"  
       } #else #if ($VMkernelPorts.PortGroupName -contains $group.Name)  
         $Obj | Add-Member -Name PortGroupType -MemberType NoteProperty -Value $Portgrouptype  
       
       $Macs = $Group.ExtensionData.port.mac -join ", "  
         $Obj | Add-Member -Name Mac -MemberType NoteProperty -Value $Macs  
       
       $Obj | Add-Member -Name AllowPromiscuous -MemberType NoteProperty -Value $Group.ExtensionData.ComputedPolicy.security.AllowPromiscuous  
       $Obj | Add-Member -Name MacChanges -MemberType NoteProperty -Value $Group.ExtensionData.ComputedPolicy.security.MacChanges  
       $Obj | Add-Member -Name ForgedTransmits -MemberType NoteProperty -Value $Group.ExtensionData.ComputedPolicy.security.ForgedTransmits  
   
       #Teaming Policy  
       $NicTeamingPolicy = Get-NicTeamingPolicy -VirtualPortGroup $Group  
         $Obj | Add-Member -Name IsLoadBalancingInherited -MemberType NoteProperty -Value $NicTeamingPolicy.IsLoadBalancingInherited  
       
       $LoadBalancing = $Group.ExtensionData.ComputedPolicy.NicTeaming.Policy  
         switch ($LoadBalancing)   
           {   
             loadbalance_ip {$LoadBalancingPolicy = "Route based on IP hash"}   
             loadbalance_srcmac {$LoadBalancingPolicy = "Route based on source MAC hash"}   
             loadbalance_srcid {$LoadBalancingPolicy = "Route based on the source of the port ID"}   
             failover_explicit {$LoadBalancingPolicy = "use explicity failover order"}   
             default {$LoadBalancingPolicy = "Can't Determine"}  
           } #switch ($LoadBalancing)  
         $Obj | Add-Member -Name LoadBalancing -MemberType NoteProperty -Value $LoadBalancingPolicy  
       
       $Obj | Add-Member -Name IsNetworkFailoverDetectionInherited -MemberType NoteProperty -Value $NicTeamingPolicy.IsNetworkFailoverDetectionInherited  
       $Obj | Add-Member -Name NetworkFailoverDetection -MemberType NoteProperty -Value $NicTeamingPolicy.NetworkFailoverDetectionPolicy  
       $Obj | Add-Member -Name IsNotifySwitchesInherited -MemberType NoteProperty -Value $NicTeamingPolicy.IsNotifySwitchesInherited  
       $Obj | Add-Member -Name NotifySwitches -MemberType NoteProperty -Value $Group.ExtensionData.ComputedPolicy.NicTeaming.NotifySwitches  
       $Obj | Add-Member -Name IsFailbackInherited -MemberType NoteProperty -Value $NicTeamingPolicy.IsFailbackInherited  
       $Obj | Add-Member -Name Failback -MemberType NoteProperty -Value $Group.ExtensionData.ComputedPolicy.NicTeaming.RollingOrder  
       $Obj | Add-Member -Name IsFailoverOrderInherited -MemberType NoteProperty -Value $NicTeamingPolicy.IsFailoverOrderInherited  
   
       $ActiveNics = $Group.ExtensionData.ComputedPolicy.NicTeaming.NicOrder.ActiveNic -join ", "  
         $Obj | Add-Member -Name ActiveNics -MemberType NoteProperty -Value $ActiveNics  
       $StandbyNics = $Group.ExtensionData.ComputedPolicy.NicTeaming.NicOrder.StandbyNics -join ", "  
         $Obj | Add-Member -Name StandbyNics -MemberType NoteProperty -Value $StandbyNics  
       $UnusedNics = $NicTeamingPolicy.UnusedNic -join ", "  
         $Obj | Add-Member -Name UnusedNics -MemberType NoteProperty -Value $UnusedNics  
       
       #All VMs having assigned PortGroup  
       $IPv4Address = $null  
       if ($Portgrouptype -eq "VirtualMachine") {  
         $VMList = $null  
         $VMList = $Group | Get-VM  
         $VMs = $null  
         $VMs = $($VMList | Select-Object -ExpandProperty Name) -join ", "  
         $IPlist = $VMList.guest.Nics | Where-Object {$_.NetworkName -eq $Group.Name}  
         $IPv4List = $IPlist.IpAddress | Where-Object {$_ -match $IPregex}  
         $IPv4Address = $IPv4List -Join ", "  
         $IPv4SubnetMask = $null  
         $PortBindingCompliance = $null  
         $MTU = $null  
         $VmkernelNic = $null  
         $PathStatus = $null  
         $MGMT = $null  
         $vMotion = $null  
         $FT = $null  
         $vSAN = $null  
           
       } #if ($Portgrouptype -eq "VirtualMachine")  
       else {  
         $iSCSIPortGroup = $esxcli.iscsi.networkportal.list($iSCSIHBA.Name).PortGroup | Where-Object {$_ -eq $Group.Name}  
         $VmkernelNicinfo = $VMkernelPorts | Where-Object {$_.PortGroupName -eq $Group.Name}  
         if ($iSCSIPortGroup -ne $null) {  
           $VMList = $null  
           $VMs = $null  
           $PortBinding = "Configured"  
           $IPv4Address = $esxcli.iscsi.networkportal.list($iSCSIHBA.Name) | Where-Object {$_.PortGroup -eq $iSCSIPortGroup} | Select-Object -ExpandProperty IPv4  
           $IPv4SubnetMask = $esxcli.iscsi.networkportal.list($iSCSIHBA.Name) | Where-Object {$_.PortGroup -eq $iSCSIPortGroup} | Select-Object -ExpandProperty IPv4SubnetMask  
           $PortBindingCompliance = $esxcli.iscsi.networkportal.list($iSCSIHBA.Name) | Where-Object {$_.PortGroup -eq $iSCSIPortGroup} | Select-Object -ExpandProperty CompliantStatus  
           $MTU = $esxcli.iscsi.networkportal.list($iSCSIHBA.Name) | Where-Object {$_.PortGroup -eq $iSCSIPortGroup} | Select-Object -ExpandProperty MTU  
           $VmkernelNic = $esxcli.iscsi.networkportal.list($iSCSIHBA.Name) | Where-Object {$_.PortGroup -eq $iSCSIPortGroup} | Select-Object -ExpandProperty Vmknic  
           $PathStatus = $esxcli.iscsi.networkportal.list($iSCSIHBA.Name) | Where-Object {$_.PortGroup -eq $iSCSIPortGroup} | Select-Object -ExpandProperty PathStatus  
           $MGMT = $VmkernelNicinfo.ManagementTrafficEnabled  
           $vMotion = $VmkernelNicinfo.vMotionEnabled  
           $FT = $VmkernelNicinfo.FaultToleranceLoggingEnabled  
           $vSAN = $VmkernelNicinfo.VsanTrafficEnabled  
         } #if ($iSCSIPortGroup -ne $null)  
         else {  
           $VMList = $null  
           $VMs = $null  
           $IPv4Address = $VmkernelNicinfo.IP  
           $IPv4SubnetMask = $VmkernelNicinfo.SubnetMask  
           $PortBindingCompliance = "Not Configured"  
           $MTU = $VmkernelNicinfo.Mtu  
           $VmkernelNic = $VmkernelNicinfo.Name  
           $PathStatus = $null  
           $MGMT = $VmkernelNicinfo.ManagementTrafficEnabled  
           $vMotion = $VmkernelNicinfo.vMotionEnabled  
           $FT = $VmkernelNicinfo.FaultToleranceLoggingEnabled  
           $vSAN = $VmkernelNicinfo.VsanTrafficEnabled  
         } #else #if ($iSCSIPortGroup -ne $null)  
       } #if ($Portgrouptype -eq "VirtualMachine")  
       $Obj | Add-Member -Name VMCount -MemberType NoteProperty -Value $VMList.count  
       $Obj | Add-Member -Name VMs -MemberType NoteProperty -Value $VMs  
       $Obj | Add-Member -Name IPv4Address -MemberType NoteProperty -Value $IPv4Address  
       $Obj | Add-Member -Name IPv4SubnetMask -MemberType NoteProperty -Value $IPv4SubnetMask  
       $Obj | Add-Member -Name PortBindingCompliance -MemberType NoteProperty -Value $PortBindingCompliance  
       $Obj | Add-Member -Name MTU -MemberType NoteProperty -Value $MTU  
       $Obj | Add-Member -Name VmkernelNic -MemberType NoteProperty -Value $VmkernelNic  
       $Obj | Add-Member -Name PathStatus -MemberType NoteProperty $PathStatus  
       $Obj | Add-Member -Name MGMT-Enabled -MemberType NoteProperty $MGMT  
       $Obj | Add-Member -Name vMotion-Enabled -MemberType NoteProperty $vMotion  
       $Obj | Add-Member -Name FT-Enabled -MemberType NoteProperty $vMotion  
       $Obj | Add-Member -Name vSAN-Enabled -MemberType NoteProperty $vSan  
       $report += $obj  
       #check under $NicTeamingPolicy more settings   
     } #foreach ($Group in $PortGroup)  
   } #foreach ($esxi in $VMHosts)  
 } #Process  
 End {  
   $report #| Export-Csv C:\Temp\NetworkInfo.csv -NoTypeInformation  
 } #End  
This is how I connected to vcenter server and executed ps1 file. and exported results to csv file, if you don't export information to csv you can view results on csv.
And exported excel/csv file looks like this
Any suggestions and modifications are welcomed.


Wednesday, December 23, 2015

WSUS on Site Server - Warning SCCM 2012 r2 prerequisite resolved

After resolving all the error and warning, this will be my last prerequisite, (warning) I am going to fulfill for SCCM 2012 R2 installation. although it is not necessary to resolve this warning right now in lab server, but as a best practice I will performing this step and also this will be documented myself and for others if anyone requires help. 
Final warning is WSUS on Site Server. 
To resolved this I have downloaded and installed WSUS administration console.
Download website.
https://www.microsoft.com/en-us/download/details.aspx?id=5216
Microsoft has written very good document on installing the console.
https://technet.microsoft.com/en-us/library/cc720498%28v=ws.10%29.aspx
I have downloaded tool and running command (As an Administrator) "WSUS30-KB972455-x64.exe CONSOLE_INSTALL=1", It will popup installation windows then select Administration Console Only, and click next until finish.
After this check I installed another Fixes KB2720211 and KB2734608 to clear warning completely.

Last Warnings Resolved
Resolved SCCM (extadsh) Schema Extension Error code 8224 and 8202
Resolved SCCM 2012 R2 - BITs Installed/Enabled Warning & Microsoft Remote Differential Compression (RDC) library failed
SQL Server security mode Warning and SQL Server process memory allocation Warning - SCCM 2012 R2 - Resolved 
SCCM 2012 R2 Prerequisite failed (USMT, Deployment Tools, Windows PE) resolved
Resolved SCCM 2012 R2 - Site server computer account administrative rights failed 

WSUS on Site Server - Warning SCCM 2012 r2 prerequisite resolved

Tuesday, December 22, 2015

SCCM 2012 R2 Prerequisite failed (USMT, Deployment Tools, Windows PE) resolved

This is my another article in the SCCM 2012 R2 installation resolving dependencies Prerequisite, I almost resolved all the prerequisite, now few are remaining, Below are the list of Prerequisite can be solve in one shot by installing ADK tool (Windows Assessment and Deployment Kit)
  • User State Migration Tool (USMT) installed - Failed
  • Windows Deployment Tools installed -Failed
  • Windows Preinstallation Environment installaed - Failed
Download  ADK tool (Windows Assessment and Deployment Kit) from Microsoft website, and Install it on SCCM, You will require internet to download and install these tools and updates it is around 3.1 GB of data. 
Link to download ADK tool
https://www.microsoft.com/en-in/download/details.aspx?id=39982 
Once installation done and after running Run check, I have only one warning left to resolve, WSUS on site Server, Which I will be resolving it in next post.

Check out My earlier resolved dependencies
Resolved SCCM (extadsh) Schema Extension Error code 8224 and 8202
Resolved SCCM 2012 R2 - BITs Installed/Enabled Warning & Microsoft Remote Differential Compression (RDC) library failed
SQL Server security mode Warning and SQL Server process memory allocation Warning - SCCM 2012 R2 - Resolved 
SCCM 2012 R2 Prerequisite failed (USMT, Deployment Tools, Windows PE) resolved
Resolved SCCM 2012 R2 - Site server computer account administrative rights failed 

WSUS on Site Server - Warning SCCM 2012 r2 prerequisite resolved

Monday, December 21, 2015

PowerCli - The remote server returned an error: (407) Proxy Authentication Required

Today one of my colleague had below issue while accessing Powercli, He was able to connect to vcenter, but after executing any command he was getting Proxy Authentication. 2 months back I had faced same issue Connect-VIserver Could not connect using the requested protocol. and same solution apply to this problem.
################################################################################
Get-VM : 12/21/2015 7:04:05 PM    Get-VM        The remote server returned an error: (407) Proxy Authentication
Required.
At line:1 char:1
+ Get-VM
+ ~~~~~~
    + CategoryInfo          : NotSpecified: (:) [Get-VM], ViError
    + FullyQualifiedErrorId : Client20_QueryServiceImpl_RetrievePropertiesEx_ViError,VMware.VimAutomation.ViCore.Cmdle
   ts.Commands.GetVM

################################################################################

This is how I troubleshooted issue.
  1.  I executed command Get-VM,
  2. But received error -The remote server returned an error: (407) Proxy Authentication
  3. I checked my status whether i am connected to vcenter using $Global:DefaultVIServer.
  4. It was connected, Name is the IP address of my vCenter.
  5. Next I checked Get-PowerCLIConfiguration
  6. I found ProxyPolicy is set to UseSystemProxy for Session scope. and it is using my proxy to connect to vCenter.
  7. I change the proxy policy to NoProxy for Session Scope using Set-PowerCLIConfiguration -Scope Session -ProxyPolicy NoProxy
  8. Press Y to confirmation on changing settings
  9. Once the changes done, You will see changed result.
  10. This is the last one, I checked Get-VM and without any issue I got my results on the console.

SQL Server security mode Warning and SQL Server process memory allocation Warning - SCCM 2012 R2 - Resolved

I received 2 SQL server related warning while installing SCCM. one of the warning is SQL Server security mode warning - The SQL Server name specified is configured for SQL authentication security. It is recommended to configure the SQL Server to operate only in Windows authentication security before you continue Configuration Manager Setup. 
To resolve this warning you will have to change SQL server configuration.
On the SQL Server, Right click SQL instance go to properties and then Security. Make sure you have selected Windows Authentication Mode only, and run check to verify warning is gone.
And the second Warning is SQL Server process memory allocation - Configuration Manager requires SQL Server to reserve a minimum of 8 gigabytes (GB) of memory for the central administration site and primary site and a minimum of 4 gigabytes (GB) for the secondary site. This memory is reserved by using the Minimum server memory setting under Server Memory Options and is configured by using SQL Server Management Studio. For more information about how to set a fixed amount of memory, see http://go.microsoft.com/fwlink/p/?LinkId=233759.

Other Errors Resolved
Resolved SCCM (extadsh) Schema Extension Error code 8224 and 8202
Resolved SCCM 2012 R2 - BITs Installed/Enabled Warning & Microsoft Remote Differential Compression (RDC) library failed
SQL Server security mode Warning and SQL Server process memory allocation Warning - SCCM 2012 R2 - Resolved 
SCCM 2012 R2 Prerequisite failed (USMT, Deployment Tools, Windows PE) resolved
Resolved SCCM 2012 R2 - Site server computer account administrative rights failed 

WSUS on Site Server - Warning SCCM 2012 r2 prerequisite resolved

On Same properties of sql server, under Memory set minimum and maximum memory to 8192. and warning will go away.
I am clearing warnings and errors one by one, next article I will be resolving WSUS on site Server Warning.

Sunday, December 20, 2015

Resolved SCCM 2012 R2 - BITs Installed/Enabled Warning & Microsoft Remote Differential Compression (RDC) library failed

These are some of the of other warning I received while installing  SCCM 2012 R2, First one is
Bits Installed Warning. / Bits Enabled Warning.
Background Intelligent Transfer Service (BITS) is required for the management point and distribution point site system roles. BITS is not installed, IIS 6 WMI compatibility component for IIS7 is not installed on this computer or the remote IIS host, or Setup was unable to verify remote IIS settings because IIS common components were not installed on the site server computer. Also, check if IIS/BITS services are running properly. Setup cannot continue until BITS is installed and enabled in the IIS settings.


When I checked IIS services components I found I have already IIS 6 WMI compatibility. but still was getting warning because BITs was not installed., To install BITs right click features in server manager, right click features and Add feature, then select feature Background Intelligent Transfer Services (BITS), once you check the box of BITS another additional extensions for IIS box will pop up (Add Required Role Services). Click it and install all required Features.
Other Errors Resolved
Resolved SCCM (extadsh) Schema Extension Error code 8224 and 8202
Resolved SCCM 2012 R2 - BITs Installed/Enabled Warning & Microsoft Remote Differential Compression (RDC) library failed
SQL Server security mode Warning and SQL Server process memory allocation Warning - SCCM 2012 R2 - Resolved 
SCCM 2012 R2 Prerequisite failed (USMT, Deployment Tools, Windows PE) resolved
Resolved SCCM 2012 R2 - Site server computer account administrative rights failed 

WSUS on Site Server - Warning SCCM 2012 r2 prerequisite resolved

Once I run check all my warning related to Bits has been gone.
Then next failed item is Microsoft Remote Differential Compression (RDC) library registered Failed
Microsoft Remote Differential Compression (RDC) library must be registered for Configuration Manager site server installation. Details at http://technet.microsoft.com/library/cc431377.aspx#RDC_for_Site_Servers.
The same way we installed BITS, We have add Remote Differential Compression Feature and Run Check on SCCM installation page, error will be gone.
Below is the explanation from Microsoft about the features I installed as Prerequisite for SCCM

The Remote Differential Compression (RDC) feature is a set of application programming interfaces (APIs) that applications can use to determine if a set of files have changed, and if so, to detect which portions of the files contain the changes. RDC detects insertions, removals, and rearrangements of data in files, which enables an application to replicate only the changed portions of a file. This is useful when replicating files over a limited-bandwidth network such as a wide area network (WAN) connection. 
Use Background Intelligent Transfer Service (BITS) to transfer files asynchronously between a client and a server.

Resolved SCCM 2012 R2 - Site server computer account administrative rights failed

This is the second error I received while installing SCCM 2012 R2 (Prerequisite check). 
Site server computer account administrative rights failed.
Configuration Manager Setup requires that the site server computer has administrative rights on the SQL Server and management point computers.
Referance: https://technet.microsoft.com/en-in/library/hh368980.aspx
In my lab I have separate machine for Sql server and separate Machine for SCCM, To resolve this you will have to add SCCM computer account in SQL server Administrators Group.
Open Computer management, go to configuration>Local Users and Groups> Group> right click Administrators> click add, then in Objct types select Computers, and Enter the SCCM computer name and click ok.

Other Errors Resolved
Resolved SCCM (extadsh) Schema Extension Error code 8224 and 8202
Resolved SCCM 2012 R2 - BITs Installed/Enabled Warning & Microsoft Remote Differential Compression (RDC) library failed
SQL Server security mode Warning and SQL Server process memory allocation Warning - SCCM 2012 R2 - Resolved 
SCCM 2012 R2 Prerequisite failed (USMT, Deployment Tools, Windows PE) resolved
Resolved SCCM 2012 R2 - Site server computer account administrative rights failed 

WSUS on Site Server - Warning SCCM 2012 r2 prerequisite resolved

Once this step is done, on the click Run Check (On SCCM Server you will see this failed check is no longer there) .

Resolved SCCM 2012 R2 (extadsh) Schema Extension Error code 8224 and 8202

I used to support SMS 2003 and SCCM 2007 in my past experiances, Its been a past while and again I wanted to test SCCM 2012 in my Lab, while new installation of SCCM 2012 R2 (Extending Schema) I received below errors.

Failed to create attribute cn=MS-SMS-Site-Code. Error code = 8224.
Failed to create attribute cn=MS-SMS-Assignment-Site-Code. Error code = 8224.
Failed to create attribute cn=MS-SMS-Site-Boundaries. Error code = 8224.
Failed to create attribute cn=MS-SMS-Roaming-Boundaries. Error code = 8224.
Failed to create attribute cn=MS-SMS-Default-MP. Error code = 8224.
Failed to create attribute cn=MS-SMS-Device-Management-Point. Error code = 8224.
Failed to create attribute cn=MS-SMS-MP-Name. Error code = 8224.
Failed to create attribute cn=MS-SMS-MP-Address. Error code = 8224.
Failed to create attribute cn=MS-SMS-Health-State. Error code = 8224.
Failed to create attribute cn=MS-SMS-Source-Forest. Error code = 8224.
Failed to create attribute cn=MS-SMS-Ranged-IP-Low. Error code = 8224.
Failed to create attribute cn=MS-SMS-Ranged-IP-High. Error code = 8224.
Failed to create attribute cn=MS-SMS-Version. Error code = 8224.
Failed to create attribute cn=MS-SMS-Capabilites. Error code = 8224.
Failed to create class cn=MS-SMS-Management-Point. Error code = 8202.
Failed to create class cn=MS-SMS-Server-Locator-Point. Error code = 8202.
Failed to create class cn=MS-SMS-Site. Error code = 8202.
Failed to create class cn=MS-SMS-Roaming-Boundary-Range. Error code = 820.
Failed to extend the Active Directory Schema, Please find Details in "ExtADSch.log".
Other Errors Resolved
Resolved SCCM (extadsh) Schema Extension Error code 8224 and 8202
Resolved SCCM 2012 R2 - BITs Installed/Enabled Warning & Microsoft Remote Differential Compression (RDC) library failed
SQL Server security mode Warning and SQL Server process memory allocation Warning - SCCM 2012 R2 - Resolved 
SCCM 2012 R2 Prerequisite failed (USMT, Deployment Tools, Windows PE) resolved
Resolved SCCM 2012 R2 - Site server computer account administrative rights failed 

WSUS on Site Server - Warning SCCM 2012 r2 prerequisite resolved

After some dig down I found one of my Active Directory holding schema was down, I powered it on and tried extending schema again using extadsch.exe, But still got the same errors because  Replication out of sync between Active Directory. so i opened command prompt as administrator and run command "repadmin.exe /syncall".
You can also use GUI to start replication., Use Active Directory Sites and Services, go to your Site, under servers Select domain controller, collapse NTDS Settings, right click on <automatically generated> and select Replicate Now. and Wait for some time.
After extending schema I received message, Successfully extended the AD schema. for further more information you can check ExtADSch.log.

Thursday, December 17, 2015

Find iLo, Drac, IMM/RSA, CIMC IP and MacAddress on esxi (vCenter)

Useful links: 
Reset the remote console (DRAC/ILO/RSA)
Reset IBM IMM (Integrated Management Module) also called IBM RSA

I found one of the interesting thing on Esxi. When you navigate to Hardware Status, under the censors, collapse Baseboard Management Controller > Management Controller IP Interface node, Here you will find one IP, Gateway and Mac Address, This Controller card is your ILO, DRAC, IMM/RSA  or CIMC card. Those are the IP and Mac of you Remote Management Card (ILO, DRAC, IMM/RSA  or CIMC card).

Here is the below screenshot how it looks like.
Happy remoting.


Monday, December 14, 2015

Format table row colors Inovation Powershell

This is my second post to earlier Format table color style odd even rows Powershell, I am eager to update it because if you see that post comments, one of the comment is from Jeffrey Snover (Father of Powershell), and he suggested some changes. (Even I am agree the output of earlier script Format-oddeven are not eyes friendly, but it was written in hurry).

Before giving the link and screenshot I would like to thanks Jim Nelson aka midnightfreddie http://midnightfreddie.com/. He worked on the script and Improvised it. (Yesterday I had Reddit it) I loved the way he used Indexing to change color of rows after every 3 lines, really brilliant use, and the second he solved my $input problem, so I don't have store information in $processData variable, It is nice learning.

#############################################
# Adapted from http://kunaludapi.blogspot.com/2015/12/format-table-color-style-odd-even-rows.html

function Format-RowColors {
    param (
        $RowsPerGroup = 3
    )
    begin {
        $Number = 0
        $ConsoleBack = [System.Console]::BackgroundColor
        $ConsoleFore = [System.Console]::ForegroundColor
        $RowColors = @(
            @{
                Back = "DarkGray"
                Fore = "Black"
            },
            @{
                Back = $ConsoleBack
                Fore = $ConsoleFore
            }
        )
    }
    process {
        $Number += 1
        # $Index will be either 0 or 1 and used to pick colors from $RowColors
        $Index = [Math]::Floor($Number / $RowsPerGroup) % 2
        [System.Console]::BackgroundColor = $RowColors[$Index].Back
        [System.Console]::ForegroundColor = $RowColors[$Index].Fore
        $_
    }
    end {
        [System.Console]::BackgroundColor = $ConsoleBack
        [System.Console]::ForegroundColor = $ConsoleFore
    }
<#
.Synopsis
Format table output row odd even colors.
.Example
Get-Service | Format-OddEven
.Notes
    NAME:  Format-OddEven
    AUTHOR: Kunal Udapi
    LASTEDIT: 10 Decemeber 2015
    KEYWORDS: Format Table color
.Link
Check Online version: Http://kunaludapi.blogspot.com
#>
} #function Format-OddEven
#############################################

Recently I received email from  

Thursday, December 10, 2015

Format table color style odd even rows Powershell

Format table row colors Inovation Powershell Version 2

Yesterday while trouble shooting some processes using Get-Process command, While viewing the results on powershell console I had trouble to locate row, I was not able to concentrate on single row in hurry. Each row I had to look carefully by moving my mouse because sometimes i was incorrectly taking values from incorrect row (upper or down), And that time I got idea struck into my mind, what if there is possibility to color the odd and even rows differently, formatting table in odd even color.

This is the script I have written to solve my problem. I hope it will be useful to you as well.
###########################Script Starts here##################################
function Format-OddEven {
    $input | foreach {
        $Number = [array]::IndexOf($ProcessData, $_)
        $ConsoleBack = [System.Console]::BackgroundColor
        $ConsoleFore = [System.Console]::ForegroundColor
        if (($Number % 2) -eq 0) {
            [System.Console]::BackgroundColor = "DarkGray"
            [System.Console]::ForegroundColor = "black"
            $_
        } #if
        else {
            [System.Console]::BackgroundColor = $ConsoleBack
            [System.Console]::ForegroundColor = $ConsoleFore
            $_
        } #else
        [System.Console]::BackgroundColor = $ConsoleBack
        [System.Console]::ForegroundColor = $ConsoleFore
    } #input
<#
.Synopsis
Format table output row odd even colors.
.Example
Get-Service | Format-OddEven
.Notes
    NAME:  Format-OddEven
    AUTHOR: Kunal Udapi
    LASTEDIT: 10 Decemeber 2015
    KEYWORDS: Format Table color
.Link
Check Online version: Http://kunaludapi.blogspot.com
#>
} #function Format-OddEven

###########################Script ends here##################################
Screenshot of result:
How do you use this script for daily use? set it in Powershell profile.
Under Documents in your User Profile create folder WindowsPowerShell, and in this folder create file Microsoft.PowerShell_profile.ps1 (If you already have this folder and file Edit it), Open the file and copy paste above code, save file. relaunch Powershell, now this profile will be loaded each time you open PowerShell. (Make sure executionpolicy is set to bypass or remotesigned)
Store your table in variable, Variable name should be always $processdata (I will work on it once get time)
$processdata =  Get-Process
$processdata | Formate-OddEven
Instead of Get-Process you can use other command as well, ie Get-Service.

Wednesday, December 9, 2015

Powershell find missing associated PTR resource records in DNS Server

Earlier I written article on "Powershell add A resource records in DNS Domain oneliner", now this post completely focuses on adding PTR record in DNS using powershell, PTR record is opposite of A record, PTR record resolves IPAddress to hostname. You will find them in reverse lookup zone. (Make sure you have added correct subnet reverse lookup zone before adding PTR record).
Alike my earlier article I will be using below 2 cmdlets to add PTR and to know information.
Get-DnsServerResourceRecord
Add-DnsServerResourceRecordPtr

I have provided instructions Powershell add A resource records in DNS Domain oneliner how to open Powershell and add DNS module, Here in this article I am executing all commands on DNS Server it self, Open Powershell (Run as Administrator). 

And fire up below oneliner command
Get-DnsServerResourceRecord -ZoneName "vcloud.lab" -ComputerName WIN2K12AD001 -RRType Ptr

This is the break down of command. 
Get-DnsServerResourceRecord = This is the CMDLET used to retrive all the records. 
-ZoneName "vcloud.lab" = -ZoneName is parameter and vcloud.lab is my domain and zonename in DNS Server. 
-ComputerName WIN2K12AD001 = This is my DNS Server. 
-RRType Ptr = I retriving perticularly PTR record only.
Below is the screenshot of the command execution it is showing blank because I dont have any PTR record.
Next I will Add new PTR resource record. 
Add-DnsServerResourceRecordPtr -Name 100 -ZoneName 33.168.192.in-addr.arpa -ComputerName WIN2K12AD001 -PtrDomainName Test.vcloud.lab -AllowUpdateAny

In above command -name will be the last octet of IP Address., put FQDN in -PtrDomainName parameter.
This is all it, I tried to create PTR record for existing A record (Update associated pointer (PTR) Record), but didnt find much, even online either. if any one know the solution he is welcome. Here I have created small script which shows what PTR records not exist or missing against A resource record.

Replace the information in the orange marked as per your environment.
 #Replace below information as per your infrastructure  
 $DnsServer = "WIN2K12AD001"  
 $ForwardLookupZone = "vCloud.lab"  
 $ReverseLookupZone = "33.168.192.in-addr.arpa"  
 ################################  
 # http://kunaludapi.blogspot.com   
 # Version: 1  
 # Created and Tested on   
 #   Windows Server 2012 R2  
 #   PowerShell 4  
 ###############################  
 $DNSAresources = Get-DnsServerResourceRecord -ZoneName $ForwardLookupZone -RRType A -ComputerName $DnsServer | Where-Object {$_.Hostname -ne "@" -and $_.Hostname -ne "DomainDnsZones" -and $_.Hostname -ne "ForestDnsZones"}  
 foreach ($DnsA in $DNSAresources) {  
   $DNSPtr = ($DNSA.RecordData.IPv4Address.IPAddressToString -split "\.")[3]  
   $DNSPtrRecord = Get-DnsServerResourceRecord -ZoneName $ReverseLookupZone -Name $DNSPtr -RRType Ptr -ErrorAction SilentlyContinue  
   if ($DNSPtrRecord -eq $null) {  
     $DNSPtrRecord = New-Object psobject  
     $DNSPtrRecord | Add-Member -Name Hostname -MemberType NoteProperty -Value "NotExist"  
     $record = New-Object psobject  
     $record | Add-Member -Name PtrDomainName -MemberType NoteProperty -Value "NotExist"  
     $DNSPtrRecord | Add-Member -Name RecordData -MemberType NoteProperty -Value $record  
   }#if  
   else {  
     $PTRHostname = "{0}.{1}." -f $DnsA.HostName, $ForwardLookupZone  
     $DNSPtrRecord = $DNSPtrRecord | Where-Object {$_.RecordData.PtrDomainName -Match $PTRHostname}  
     if ($DNSPtrRecord -eq $null) {  
       $DNSPtrRecord = New-Object psobject  
       $DNSPtrRecord | Add-Member -Name Hostname -MemberType NoteProperty -Value "NotExist"  
       $record = New-Object psobject  
       $record | Add-Member -Name PtrDomainName -MemberType NoteProperty -Value "NotExist"  
       $DNSPtrRecord | Add-Member -Name RecordData -MemberType NoteProperty -Value $record  
     }#$if  
   }#else  
   $Obj = New-Object psobject  
   $Obj | Add-Member -Name Hostname -MemberType NoteProperty -Value $DnsA.Hostname  
   $Obj | Add-Member -Name IP -MemberType NoteProperty -Value $DnsA.Recorddata.IPv4Address.IPAddressToString  
   $Obj | Add-Member -Name DNSPtrRecord -MemberType NoteProperty -Value $DNSPtrRecord.Hostname  
   $Obj | Add-Member -Name PTRHostName -MemberType NoteProperty -Value $DNSPtrRecord.RecordData.PtrDomainName  
   $Obj   
 }#foreach  

I have executed this script on DNS server, if you are using RSAT tool, you can use it remotely, fill up the information, copy paste code in text file, rename extension to .ps1
and execute it using .\filename.ps1 (Make sure powershell execution policy is set to bypass or remotesigned) 
You can check my earlier Powershell articles on how to execute powershell script. once script is executed you will see result something like below, also you can export this list to csv and view it in excel.